Finance tab
Here, you can define if your organisation uses VAT, remissions, bursaries, and subsidies. You can also set if you use Discounts, and Invoice set ups, to name just a few.
Areas in this tab include:
- Finance Detail Area
- Discount Area
- Invoice Area
- Payment Area
- Finance Email Area
Finance Detail Area
It's important to note that the system as standard, bills schools by academic year.*
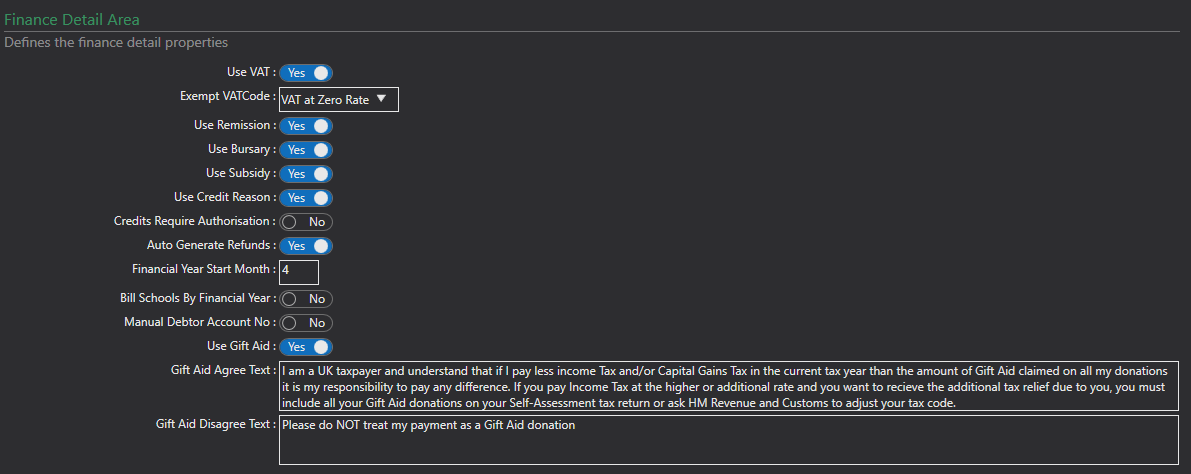
Use VAT - set this to Yes if you would like to apply VAT to any of your fees.
Exempt VAT Code - signal which VAT Code you want to be Exempt from VAT.
Use Remission - enable this option if you wish to offer Remissions to your pupils. You will need to create at least one remission once enabled. Find out more on creating remissions here.
Use Bursary - turn this option on if you want to offer and manage Bursary funds. Once enabled you will need to create a bursary fund to apply them. Find out more here.
Use Subsidy - set this to yes if you have an arrangement with schools to subsidise part of the fees applied to some pupils in direct billed lessons. Once enabled you will need to create a subsidy before you can apply this to the pupil/school. You can read more on how to do this here.
Use Credit Reason - if you want to define a list of reasons why a credit is created, and apply those reasons to your credit, enable this option. You can then create your reasons in the Finance Section. Read more here.
Credits Require Authorisation - when this setting is enabled, any credits created are set to pending until a User authorises them. This can be done by clicking on the Credit Approvals from the Tasks menu.
Auto Generate Refunds - when enabled, the system will auto generate a refund if an authorised credit puts an account into a negative balance.
Auto Re-Allocate Over Payments - If you post a credit, or re-calculate and it results in a negative balance against an invoice, the system will re-allocate to another outstanding invoice.
Financial Year Start Month - if you want to bill schools by financial year instead of academic year, enter the month number that the start of financial year starts on in here.
Bill Schools by Financial Year - if you want to bill school by financial year enable this option.
Manual Debtor Account No - Enable this option if you would like to specify the number that is added to each debtor. Alternatively if unticked, the system will automate this.
Use Gift Aid - if your organisation want to claim for Gift Aid, enable this setting. Once enabled 2 new fields will appear:
Gift Aid Agree Text - Enter the text that you would like to appear on the Portal that will show next to the tick box for gift aid, describing what the payer is agreeing to.
Gift Aid Disagree Text - Enter the text that you would like to appear on the Portal that will show next to the tick box for when a payer does not agree to gift aid.
Discount Area
In this section you can set out if you offer discounts, and how they apply. These are discussed below.

Sibling Discount Type - by default it is set to None and no other options will appear. If you wish to offer a Sibling Discount please tick if it's going to be a Value Discount, or Percentage Discount. You can enter the value in the Sibling Discount field further below.
Apply Sibling Discount To First Sibling - set this to yes if the first pupil is to receive the sibling discount where more than one pupil from a family is taking activities.
Sibling Discount - enter the value of the discount you wish to offer
You will also need to state what service areas attract the the Sibling Discount.
Apply Sibling Discount Across All - enabling this means that the system will look for a sibling enrolled in anything. By ticking this, the other tick boxes will disappear.
Apply Sibling Discount Across Groups and Tuition - when selected will cause the system to search for a sibling in Groups and Tuition. Selecting this option will make the bottom three options disappear.
Apply Sibling Discount Across Groups - select this option if you only want to offer discounts for siblings across Groups.
Apply Sibling Discount Across Tuition - enable this option if you want to offer discounts for siblings in Tuition.
Apply Sibling Discount Across Resources - if this one is ticked, it will look for a sibling who also has hire of a Resource.
Invoice Area
This area defines how your system handles invoices.
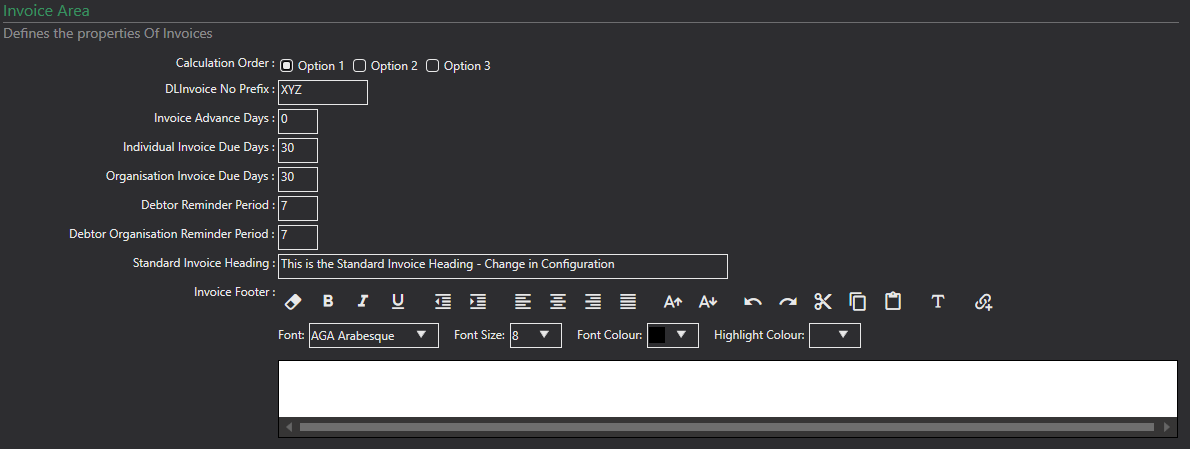
Calculation Order - This is where you define how your system calculates the fees, including what is calculated first (discounts, remissions etc.). There are three options:
- Option 1: Uses the order; Discount Code, Subsidy, Sibling Discount, Multiple Activity Discount, Pupil Remission, Bursary 1, Bursary 2, and Discount.
- Option 2: Uses the order; Discount Code, Subsidy, Pupil Remission, Bursary 1, Bursary 2, Sibling Discount, Multiple Activity Discount and Discount.
- Option 3: Uses the order; Discount Code, Pupil Remission, Bursary 1, Bursary 2 Sibling Discount, Multiple Activity Discount, Subsidy, and Discount.
DLInvoice No Prefix - this is where you can add a prefix to your invoices. Anything entered here adds will appear at the beginning of your invoice numbers.
Invoice Advance Days - with this field you can enter how many days in advance of the term/year you would like the invoices to automatically be emailed out.
Individual Invoice Due Days - enter how many days the parental debtors have to pay any manual invoices.
Organisation Invoice Due Days - enter how many days an Organisation has to pay any manual invoices.
Debtor Reminder Period - use this field to enter in days, when an automatic reminder email will be sent to debtors to pay their invoice. The email is only sent to debtors who do not have a payment schedule in place. If set to zero then it won't send reminder emails.
Debtor Organisation Reminder Period - use this field to enter in days, when an automatic reminder email will be sent to Organisations to pay their invoice. If set to zero the system won't send any reminder emails.
Standard Invoice Heading - you can enter a standard heading that will appear on all your invoices here.
Invoice Footer - enter your invoice footer details in here. These will appear on all of your invoices.
Payment Area
The Payment Area is where you come to define the payment options and set out the frequency of automated messages around them.
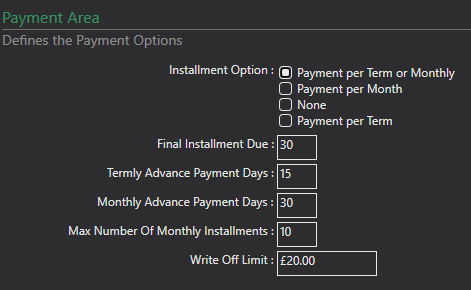
Installment Options - here you can set if you want to take installments, and if so whether they are monthly, termly, or both (where your customer gets to decide). This is set for the whole organisation and cannot be changed for each activity.
Final Installment Due - is where you get to set the number of days before the end of your academic year that you require the total amount or final payment paid.
Termly Advance Payment Days - enter how many days before the start of the term you require the next terms payments. This is for Termly installments.
Monthly advance payment Days - enter how many days before the start of the next month you require the payment.This is for Monthly installments.
Max Number Of Monthly Installments - this is where you set the maximum number of installments you want to offer.
Write Off Limit - determines at what value an invoice can be written off. Usually, this might be done if a small or negligible fee remains on the debtor’s account. To learn more on how to Write Off an invoice see here.
Finance Email Area
Here you can set any Finance email addresses you have, and control if automatic emails are sent out around finance changes to debtor's accounts.
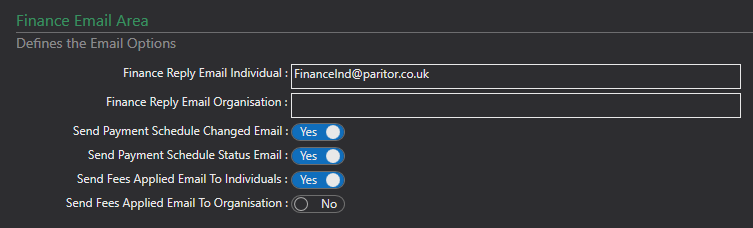
Finance Reply Emails - If your organisation has alternative finance email addresses, You can enter them here. Any of the emails associated with Finance from the system will come from these addresses. If left blank the system will use the default email address in the Comms tab of the System Configuration menu.
Send Payment Schedule Changed Email - select this option if you would like the system to send a debtor a notification if their payment schedule changes.
Send Payment Schedule Status Email - select this option if you would like the system to send a debtor a notification if their payment schedule status changes. To find out more about statuses see here.
Send Fees Applied Email To Individuals - enable this option if you would like the system to send a notification to the debtor when fess have been applied to their account.
Send Fees Applied Email To Organisation - - enable this option if you would like the system to send a notification to an organisation when fess have been applied to their account.
Send Email on Invoice Recalc - Turn this on to allow the system to send your customers an email when a recalculation has taken place against their invoice.
Send Scheduled Payment Email - When a scheduled payment is coming up, the system will notify the debtor in advance.
Send Scheduled Payment Email Processed - When a scheduled payment has been taken, the system will email the debtor to let them know.