Adding a Study
Adding a Study
 To add a Study, go to the Tuition menu in your side menu bar and select Studies. Then, use the Add a New Record icon to start adding a Study. Your screen should now look like the example below:
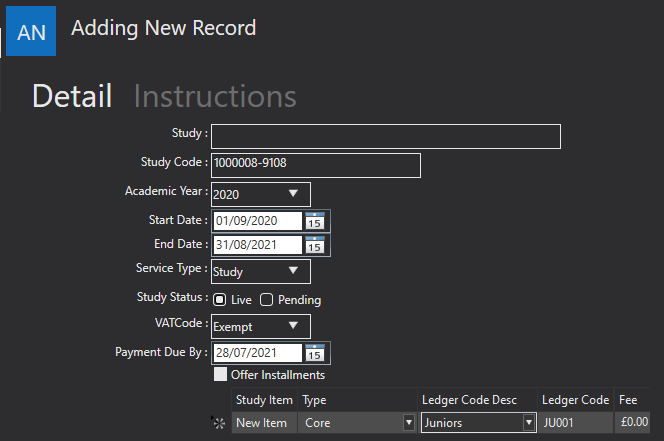
The first text box called Study is for the name of your Study.
The Xperios system automates the Study Code; however, you can edit this if you have your study code.
Then select the Academic Year when the Study takes place. This will be a drop-down list of academic years you have set up.
The Start Date and End Date are the dates that the Study runs to and from.
Your Service Type should have been created before adding a Study to the Xperios system. Then, the correct Study Service Type should be selected from the drop-down box options.
The Study Status allows you to select if the Study is “live” or “pending”, depending on if you want it available straight away.
The VATCode option allows you to select from your created VAT codes. These can be set up in your system settings. To see how to do this, please see page 61.
The Payment Due By date is the last date for any related payments to the Study.
You can then select if you want to Offer Instalments for the payments.
There is also an Instructions tab detailing the instructions that will show when a pupil applies to the Study. These instructions are also available to view when a pupil or the pupil’s payer log into the Live Portal and view their Studies.
Once you are satisfied with the details, use the Save icon to save the record.
Editing a Study
 To Edit a Study, go to Studies and click on the one you want to edit. In the left-hand corner you will find the Edit Record icon. Selecting this will open a window like the add record view, however, it should also include the fields you filled in previously, when creating the Study.
![]() When you Edit your record, the back arrow will appear. This allows you to Undo Edit Changes. The back arrow will not work after you have saved the record as your new changes will have replaced your previous save.
When you Edit your record, the back arrow will appear. This allows you to Undo Edit Changes. The back arrow will not work after you have saved the record as your new changes will have replaced your previous save.
 Once you have finished adding or editing your Study select the Save button in the left-hand corner. Note: this will not appear until you have added or edited at least one piece of information.