Adding a Group
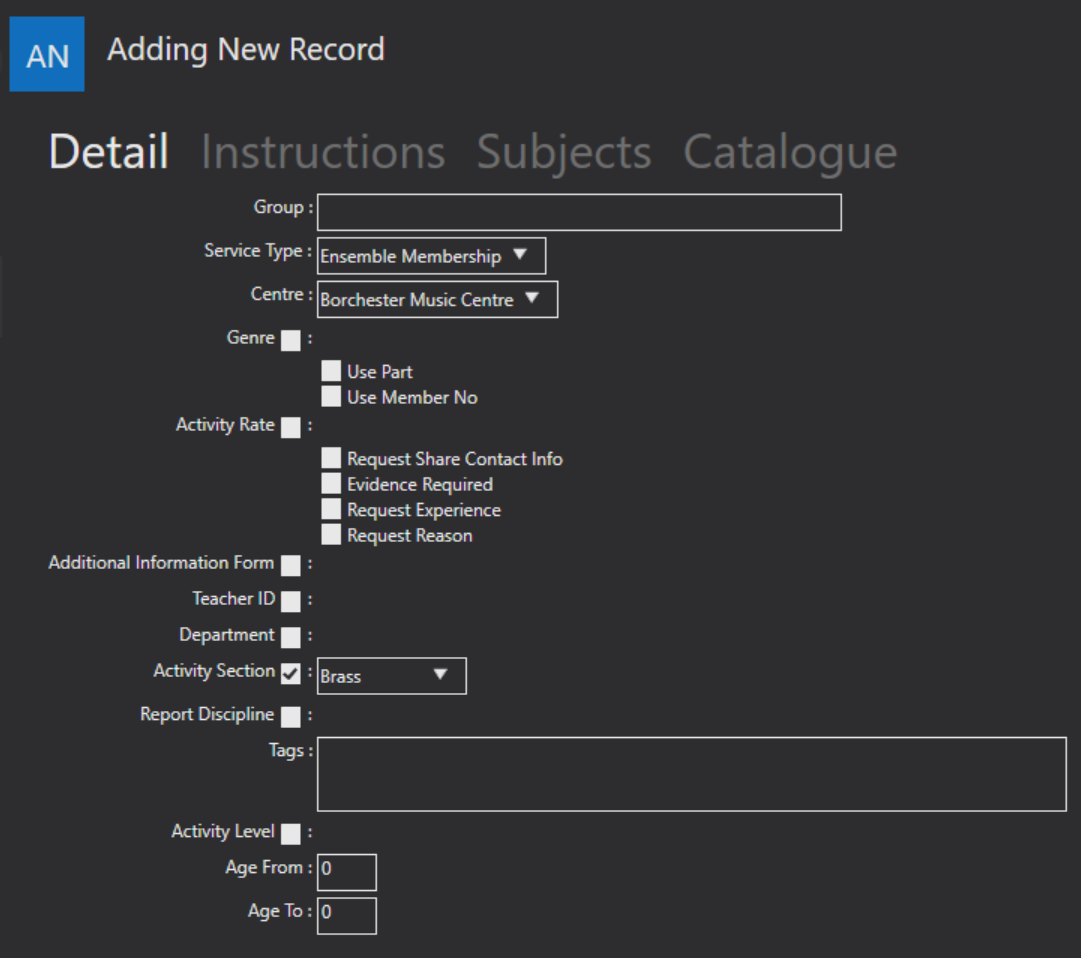
 To Add a Group, go to the Tuition menu in the side menu bar, then click on Groups. From along the bottom click the Add New Record button. On selecting this the display shown in the example below should appear.

Here, you can fill in the details for your Group. Some of the fields use drop-down menus. These drop-down menus are pre-defined in your System Settings.
The Group field should define the name of the Group you are creating.
The Service Type drop down will display any Group Service Types that have been selected. If you have more than one you will need to select the one most applicable to the group
The Centre field should determine the location at which the Group convenes.
If the Genre tick box is selected, the accompanying drop-down menu should provide Genre options for you to choose from. For information on setting these up, see page 51 .
Use Part is the part a member plays in a Group, for example, their role within an orchestra.
Use Member No will allow you to allocate a unique number to each member.
Ticking the Activity Rate box produces a drop-down list from which you can select the kind of activity fee you wish to apply to the Group. For information on setting these up, see page 59.
Ledger Code (appears when the Activity Rate option is ticked) allows you to select a ledger code option for financial tracking purposes. For information on setting up ledger codes, see page 60.
If the Request Share Contact Info tick box is ticked, it will add the following tick box to the application process; "I agree my contact data can be shared with other members of this Group"
If Evidence Required tick box can be selected if you wish applicants to include a portfolio, qualification, or evidence of skill level with their application.
The Request Experience check box is like the Evidence Required check box. The applicant can write a statement when this check box is selected.
The Request Reason check box will allow the Group member to fill out a text box field that explains why they want to be a member of the establishment.
The Additional Information Form tick box can be selected if you wish to ask applicants for further information that is outside of the standard enrolment process.
The GAEnabled tick box allows you to enable gift aid.
The Teacher ID tick box defines which teacher is responsible for the Group and triggers a drop-down box selection of names to appear.
Activity Sections can be ticked to produce a selection of choices for defining the location of the Group within your organisation's online Activity Section or catalogue. Ticking this box will cause the Catalogue tab and accompanying tabs (Description, Minimum Requirements, and Audience) to appear under your Groups. To see how to set up your activity sections, please see page 55.
Department determines the department responsible for the Group. These can be set up in system settings. For information on how to do this, see page 25.
Report Discipline is used to link the Group to report sections.
Tags allow for the Group to search for more easily on the live portal.
Start Date Options include “Start Anytime”, which allows new Group members to join at any time, and “Start of Term”, which only allows new members to join at the start of a school term.
Activity Level can be ticked to produce a selection of choices for defining the intended skill level of members joining the Group. This option will only appear if you have activity sections ticked. To see how to set up your activity levels, please see page 55.
The Age From and Age To boxes should be filled out with the age range applicable for this Group. This option will only appear if you have activity sections ticked.
Once you have finished adding your Group select the Save button in the left-hand corner. Note: this will not appear until you have added or edited at least one piece of information.
Editing a Group
 To Edit a Group, go to Groups and click on the one you want to edit. In the left-hand corner you will find the Edit Record icon. Selecting this will open a window like the add record view, however, it should also include the fields you filled in previously, when creating the Group.
 When you Edit your record, the back arrow will appear. This allows you to Undo Edit Changes. The back arrow will not work after you have saved the record as your new changes will have replaced your previous save.
 Once you have finished adding or editing your Group select the Save button in the left-hand corner. Note: this will not appear until you have added or edited at least one piece of information.