Wating List
Next, teachers have the Waiting List. This is made up of 4 sections:
- Waiting List
- Under Consideration
- Teacher Accepted
- Declined Offers
What appears for your teachers will depend on if you have Allow Teachers to Manage Waiting Lists enabled in Teachers tab of the Settings menu.
This is a list of all the pupils who have applied to a prospectus assigned to that teacher. You can find out more about setting up a Prospectus here. Depending on the access you have given your teacher in the Teacher section of the System Configuration menu, the waiting list may be a list they can view, or they may be able to accept and reject people on the waiting list.
Clicking the eye icon will show the teacher information about the applicant including their; age, school year, subject, current level, duration, preferred start date, and when they applied.
Clicking the envelope icon displays a message window where the teacher can send the applicant a message regarding their application.
We'll now split this guide into two sections, Allow, or Don't Allow when discussing below.
Don't Allow Teachers
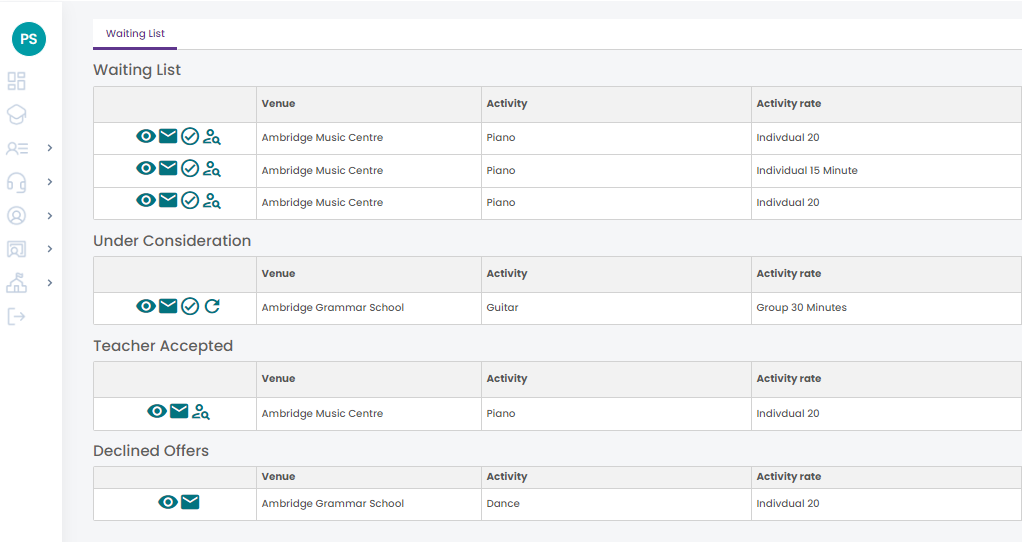
When a Don't Allow Teacher clicks on their Waiting List menu, they will see the following screen:

Once a person has applied their application will first land in the Waiting List heading. This has the following icons. See below for a description of what happens when the new items are selected.
- View
- Message
- Accept
Clicking Accept means that the Teacher has reviewed the waiting list item and agrees that they are happy to teach them. The waiting list item will then appear under a new heading - Teacher Accepted. Under this heading Teachers can move the item back to Considering.
As Admin, you can see when a Teacher has Accepted in Xperios by running the Tuition List report. Items that have been Accepted will show with a deep orange status icon - see later in this article. - Considering
Clicking Considering means that the Teacher is reviewing the waiting list item. The item will appear under a new heading - Under Consideration. Under this heading Teachers can Accept, or move the item back to the Waiting List stage.
As Admin, you can see when a Teacher is Considering in Xperios by running the Tuition List report. Items that are being considered will show with a yellow status icon. - Declined
The declined offers shows shows any offers that have been declined. these have either been declined due to the parents declining the offer or the system declining the offer as the parent did not respond in the allocated amount of time. This is set on the service type. Teachers can view the offer, send a secure message, revoke the offer, resend the offer with a new notification or cancel the application.
Allow Teachers
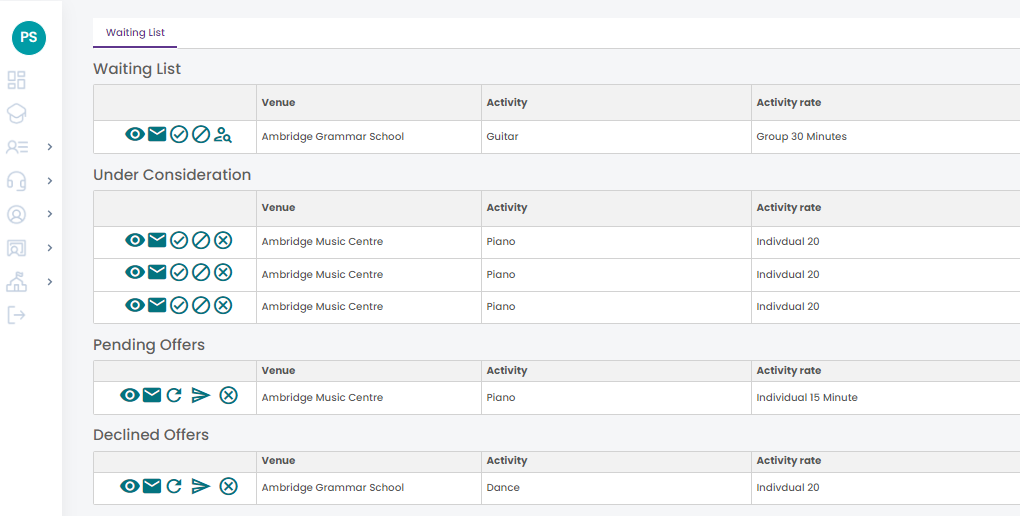
When an Allow Teacher clicks on their Waiting List menu, they will see the following screen:

Like above, once a person has applied their application will first land in the Waiting List heading
- View
- Message
- Accept
Clicking Accept means that the Teacher has Accepted the pupil into tuition and will send the Parent an offer. See further down the page to see how this process works. The waiting list item will then appear under the Pending Offers heading. The Teacher Accepted heading will not show for Allow Teachers.
In the Tuition List report in Xperios, these items show as Offer Placed.
- Considering
Clicking Considering means that the Teacher is reviewing the waiting list item. The item will appear under a new heading - Under Consideration. Under this heading Teachers can Accept, Reject the application providing a reason, or move the item back to the Waiting List stage.
As Admin, you can see when a Teacher is Considering in Xperios by running the Tuition List report. Items that are being Considered will show with a yellow status icon
- Pending Offers
The pending offers are a list of any offers teachers have sent out that are waiting on a response. Teachers can view the offer, send a secure message, revoke the offer, resend the offer with a new notification or cancel the application.
Accepting Offers
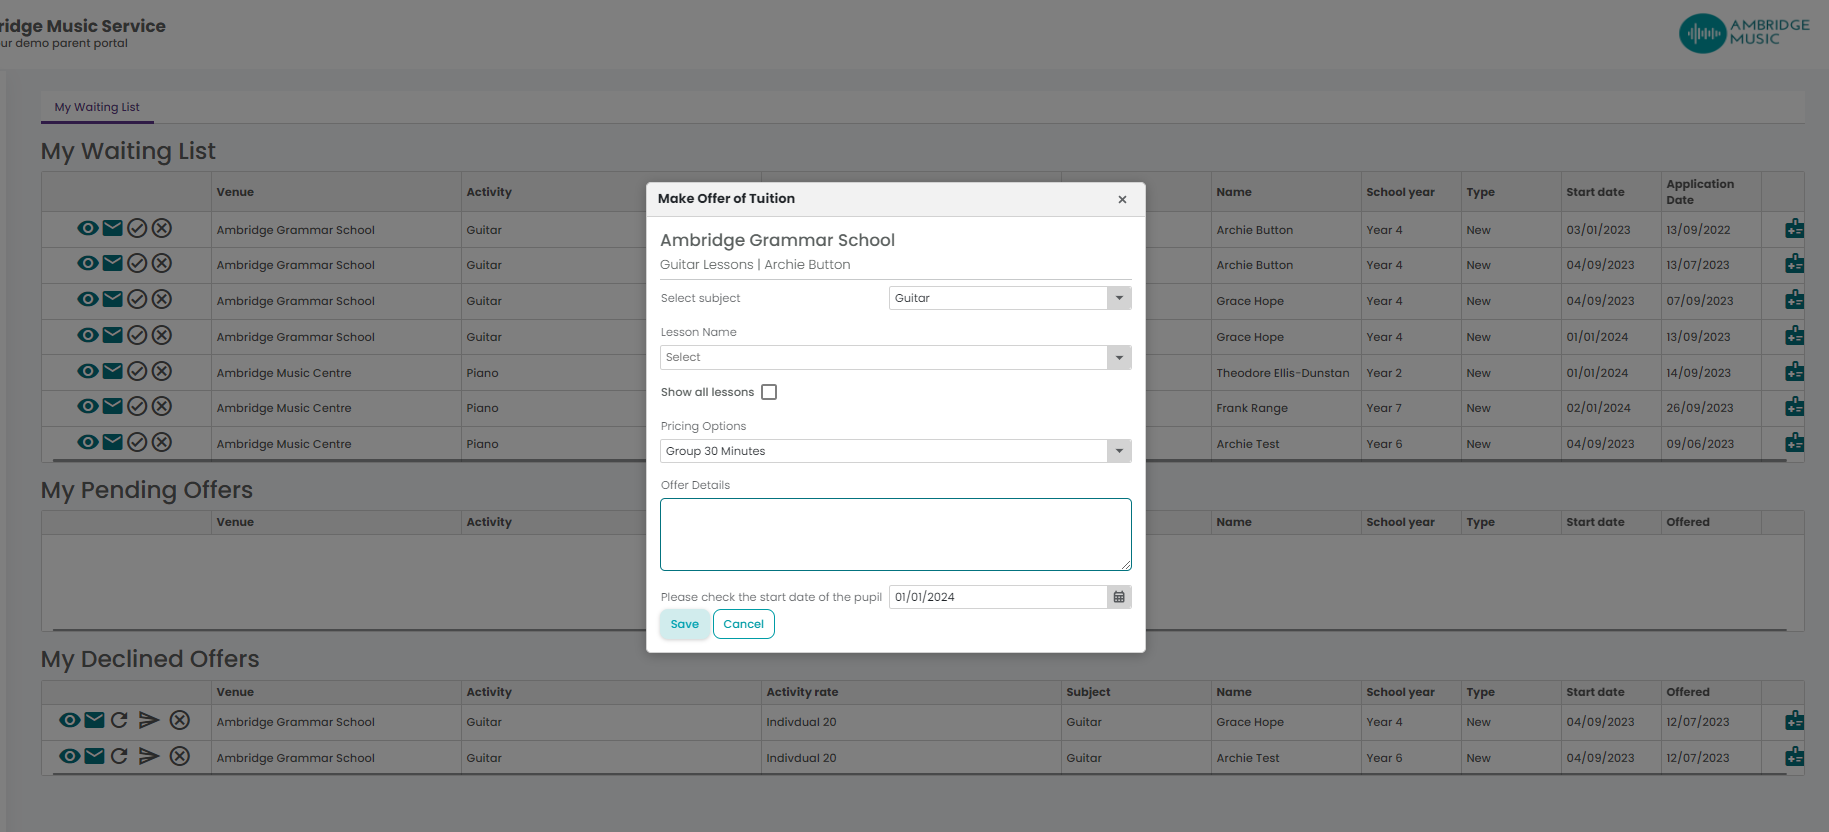
If the teacher accepts a pupil from the waiting list, a pop-out window as above will appear.
Select subject - first, the teacher needs to select the Subject the pupil will be studying.
Lesson Name - next the teacher will be able to select the lesson the pupil will be part of. By default, Teachers can only select from the existing lessons they teach. However, if they tick Show all lessons, this will display a full list.
Pricing Options - this field will default to the charge the applicant selected as part of the application process, but teachers can change this. If the applicant has chosen to hire an instrument, the teacher can accept that here too. This does not assign them a specific instrument but will go onto the resources required list.
Offer Details - the teacher can use the offer details to add any additional information they wish to tell the pupil.
Please select the start date of the pupil - finally, they need to select the date of when the pupil will start the tuition.
Save - press this to confirm the acceptance.
