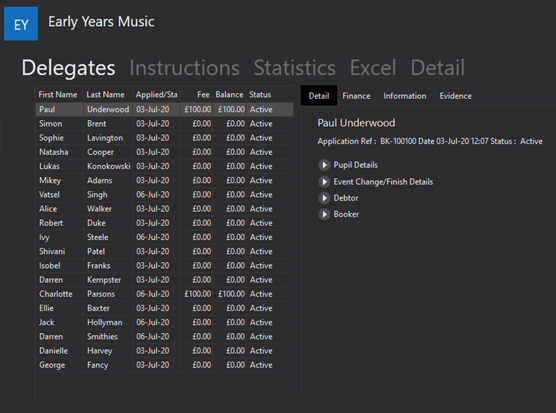
Managing Delegates
Managing delegates is similar throughout all tuition.
To find a list of applicants for any tuition select the Tuition icon in the tool bar. From here, select the tuition that you want to see the applicants for.
When you select an applicant, you can choose what you want to do with their application by selecting one of the icons at the bottom of the page. The icons explained below are common in all types of tuition, there are then some extra icons for different types of tuition. The explanation for these can be found under the section for that type of tuition.

![]() This icon is used to Toggle applicants, so that you can select multiple at once. This can be used when sending an email to multiple pupils at once or can be used in transfer mode to transfer multiple applicants. The Toggle icon will put a tick box beside the name of every applicant. You can then tick the names of any applicants you want to include. A tick box at the top left of the page will allow you to select all applicants. This way, you can untick those who you don’t want to send an email to.
This icon is used to Toggle applicants, so that you can select multiple at once. This can be used when sending an email to multiple pupils at once or can be used in transfer mode to transfer multiple applicants. The Toggle icon will put a tick box beside the name of every applicant. You can then tick the names of any applicants you want to include. A tick box at the top left of the page will allow you to select all applicants. This way, you can untick those who you don’t want to send an email to.
 The Filter icon allows you to show or not show delegates that don’t have a status of “Active”. On first clicking the Filter icon it will Show all Items, on clicking it a second time these items will be hidden as they were before.
![]() This icon is used to send a Secure Message to the delegates. This will be accessed through the Portal. They will receive an email to let them know that they have a new secure message to read. Any Secure Messages sent are logged against the individual in the Journal tab of their record card.
This icon is used to send a Secure Message to the delegates. This will be accessed through the Portal. They will receive an email to let them know that they have a new secure message to read. Any Secure Messages sent are logged against the individual in the Journal tab of their record card.
![]() You can also send an email to the recipient. Any Emails sent are logged against the individual in the Journal tab of their record card.
You can also send an email to the recipient. Any Emails sent are logged against the individual in the Journal tab of their record card.
![]() Journal entries can be added using this icon. For example a note can be added if you need to call them, or if they came in to discuss something. These are saved against the Journal tab of their record card.
Journal entries can be added using this icon. For example a note can be added if you need to call them, or if they came in to discuss something. These are saved against the Journal tab of their record card.
![]() Use this icon to withdraw delegates from tuition.
Use this icon to withdraw delegates from tuition.
![]() User this icon to transfer delegates out.
User this icon to transfer delegates out.