Adding Exams
 To add Exams, select the Tuition icon followed by Exam Sessions. Then click on the plus icon to add a new record.
Your screen should now look like the example below.
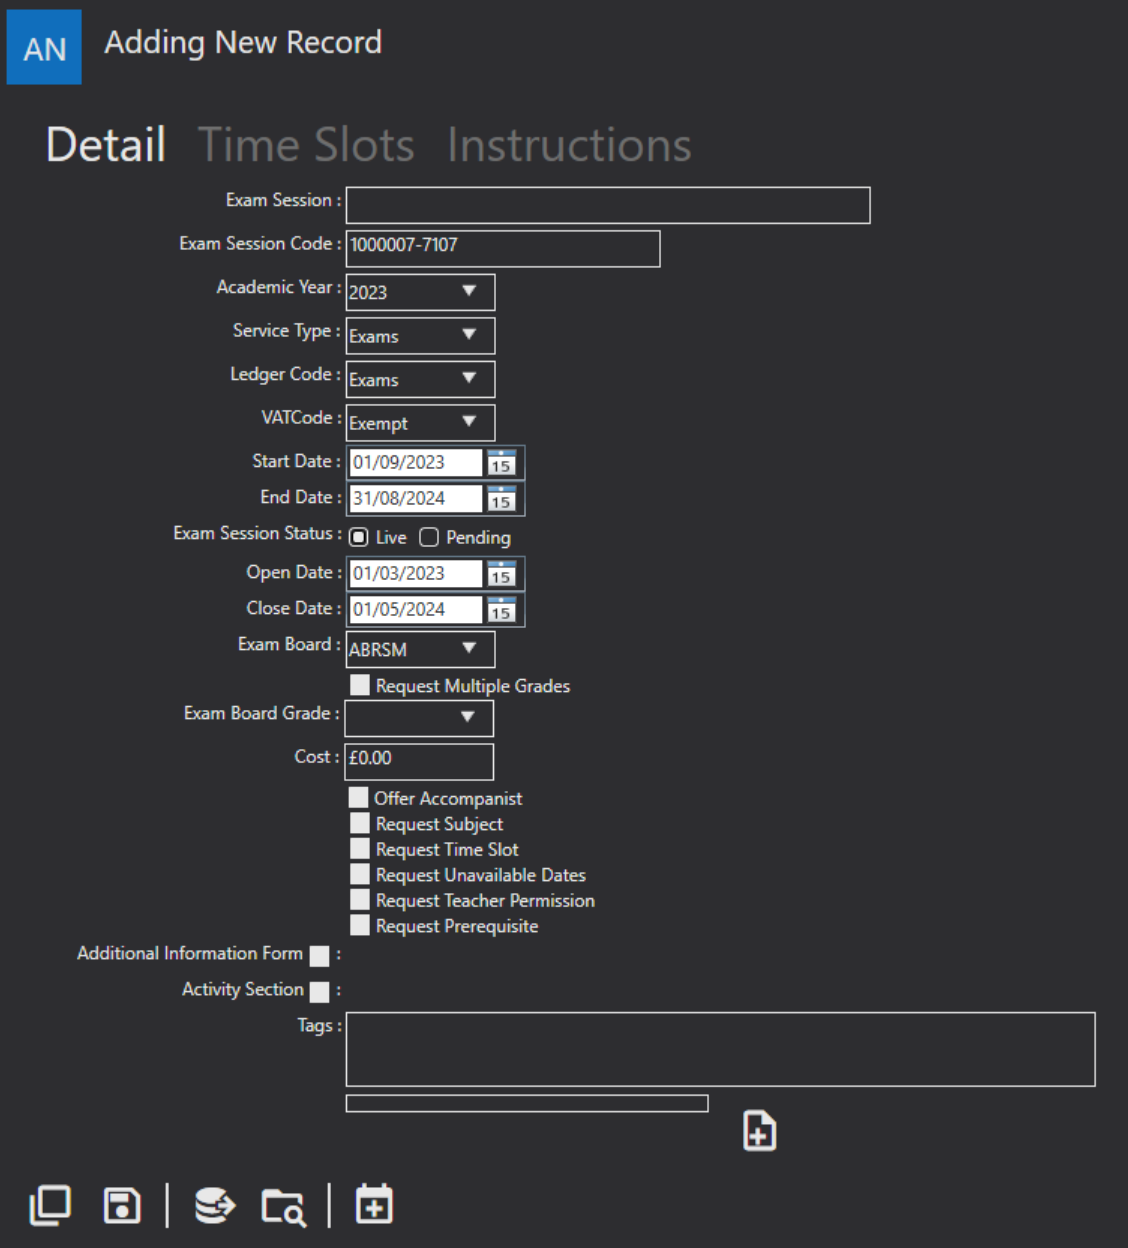
Exam Session field should be filled with the details of the Exam being taken.
Exam Session Code will be automatically generated for you. It's an identification number for the Exam. This can be edited by typing a new code in the correct field.
Academic Year is the year when the Exam takes place. This will be a drop-down list of academic years you have set up.
Service Type must be selected from a drop-down list. Your Service Type is the division within your organisation that you wish to assign this Exam to. Each Service Type will ask for specific requirements from your applicants.
Ledger Code is used for the financial tracking of certain departments within an organisation. For example, in a music school, each lesson type might have a different Ledger Code. Therefore, the corresponding Ledger Code for this Exam should be included here.
VAT Code will be a drop down with a selection of the VAT codes you have set up.
Start Date and End Date should include when the exam period will begin and end. These dates can be chosen using the calendar icon beside this field. Often, an examiner will be invited into an institution for a set number of days. Within this time frame, the pupil will be examined.
Exam Session Status can be Live or Pending.
- Live exams allow pupils to currently book onto.
- Pending exams are yet to be available for bookings.
Open Date and Close Date refer to the time window a pupil has to book onto an exam.
Exam Board refers to the board of examination which will be examining pupils. Different exam boards for this drop-down list can be created under the Settings Menu.
Request Multiple Grades allows you to set the exam to be open for more then one grade. If selected a new Grades tab will appear along the top of the Exam where you can define the grades available.
Exam Board Grade allows you to select the grade for the exam.
Cost should be filled with the price of the examination. This only appears on the detailed screen if multiple grades is not selected. This is because it is the cost for the one grade selected.
Offer Accompanist is where the you can offer if an accompanist is permitted for the exam. You can also add a cost for this. If Request Multiple Grades has been enabled, this option will appear under that tab instead, as you can choose to offer an accompanist for all the grades you add, some of the grades you add or none.
Request Subject refers to the subject or instrument on which the pupil wishes to be examined. If selected a new Subjects tab will appear along the top of the Exam where you can define the Subjects available.
Request Time Slot allows pupils to select a time slot for their exam. These are defined by you in the Time Slots tab along the top.
Request Unavailable Dates allows the pupil booking the Exam to stipulate times and dates of unavailability so that the organisation can book them an Exam around these periods.
Request Teacher Permission ensures that the teacher has permitted the Exam to go forward as they are under the belief that the pupil is ready to undertake the Exam.
Request Prerequisite allows you to ask the pupil a question to verify their skill level and suitability for the Exam. For example, a prerequisite might ask: “Have you completed your theory examination?”. In reference to this example, Request Prerequisite Date might ask when the pupil’s theory examination was taken. If ticked a new text field will appear. Enter the prerequisites to undertaking the exam in this field.
Additional Information Form is a drop-down list of the additional information forms you have created in your system.
Activity Section breaks down exams into different sections. You can set these up in settings.
Activity Level will appear as an option if the activity section is ticked.
Tags can be added and will be included in reports. You can then filter based on your added tags.
Editing an Exam
 To Edit an Exam, go to Exams and click on the one you want to edit. In the left-hand corner you will find the Edit Record icon. Selecting this will open a window like the add record view, however, it should also include the fields you filled in previously, when creating the Exam.
 When you Edit your record, the back arrow will appear. This allows you to Undo Edit Changes. The back arrow will not work after you have saved the record as your new changes will have replaced your previous save.
 Once you have finished adding or editing your Exam select the Save button in the left-hand corner. Note: this will not appear until you have added or edited at least one piece of information.