Adding Events
Adding Events
 To add Events, select the Tuition icon from the side menu bar followed by Events. Then click on the plus icon to add a new record.
Your screen should now look like the example below.
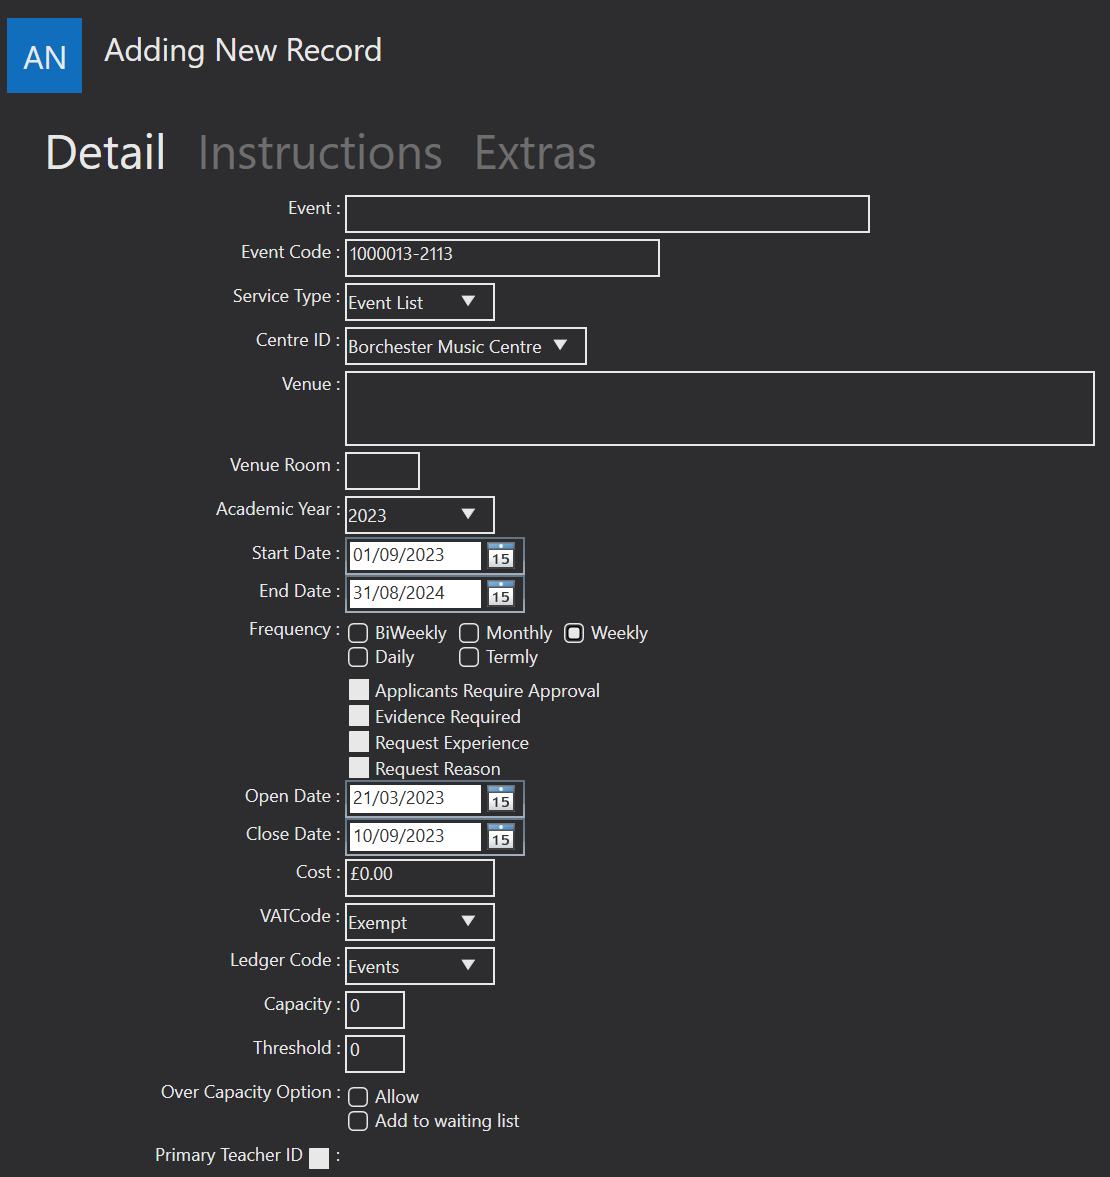
Event will need to be filled with the name of the Event being held.
Event Code will be automatically populated with an generated identification number for that Event. This can be edited by over-typing.
Service Type can be selected from the drop-down box.
Centre ID refers to the venue that the Event is taking place. Choose an option from the automatically generated drop-down list. The options available consist of any Centres added to your Contacts list.
Venue refers to the venue name that will appear to all Event applicants.
Venue Room is the room in which the Event is held.
Academic Year is when the Event takes place. This will be a drop-down list of academic years you have set up.
Start Date and End Date should include when the Event will begin and end. These dates can be chosen by clicking on the calendar icon beside this field.
Frequency is the frequency with which the Event occurs. Options include “Bi-Weekly” (Fortnightly), “Monthly”, “Weekly”, “Daily”, and “Termly”.
Applicants Require Approval asks that a teacher approves that the applicant is suitable for the Event. This will also add the deposit option, allowing you to add a deposit fee if required to pay before being accepted. These are known as Two Tiered Events.
Evidence Required asks the applicant to upload evidence of their skill level, for example, a certificate of achievement. if selected a new field will appear where you can enter details of the evidence required.
Request Experience asks the applicant for some examples of their skill level. This could include a certificate or a video of them playing an instrument.
Request Reason asks the applicant to provide a reason for their request for an invitation to the Event.
Open Date and Close Date refer to the dates within which applications to the Event will be open and NOT the dates between which the Event will be held.
Cost should be filled with the price of the Event.
VAT Code should include a VAT code for financial purposes.
Ledger Code is used for the financial tracking of certain departments within an organisation. For example, in a music school, each lesson type might have a different Ledger Code. Therefore, the corresponding Ledger Code for this Event should be included here.
Capacity refers to the maximum number of guests that can attend the Event.
Threshold refers to the minimum number of guests required for the Event to be held.
Over Capacity Option - If Allow is selected this will add applicants to the event, even if the capacity has been reached. If Add to Waiting List is selected, additional guests will be added to the waiting list. This will become useful should some spaces become available later.
Primary Teacher ID allows you to select the teacher who can authorise Event attendance.
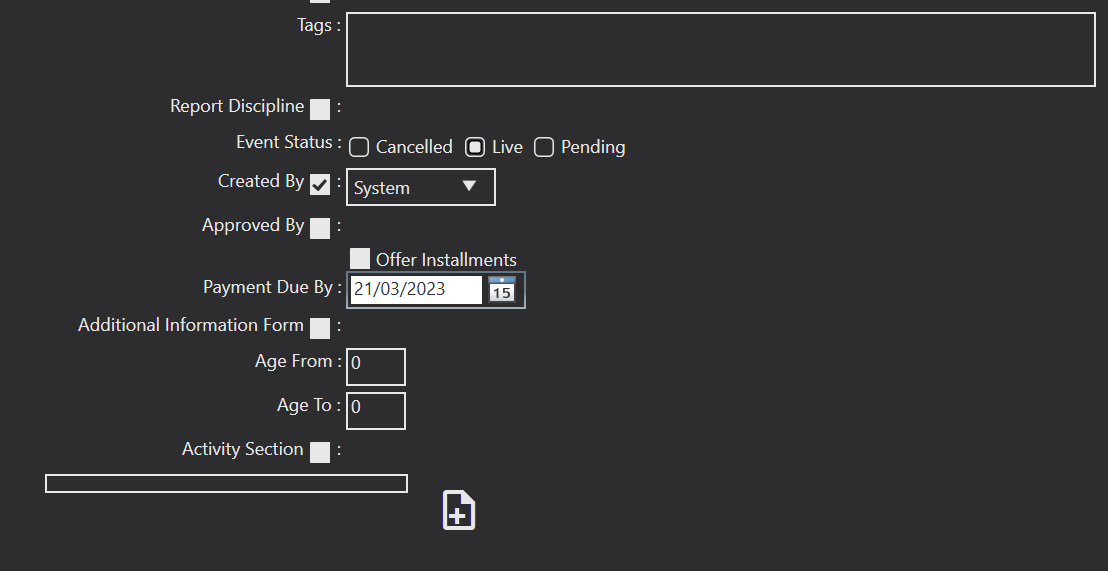
Tags can be added and will be included in reports. You can then filter based on your added tags.
Report Discipline is used if you will be creating pupil performance reports for this event. Enable the option and select the discipline from the drop down that is applicable.
Event Status can be:
Cancelled - the Event has been cancelled.
Live - the Event is accepting bookings at this time.
Pending - the Event will be taking bookings in the near future.
Created By should include the name of the individual or User who has created/ is hosting the Event.
Approved by should include the name of the teacher or User who authorises the Event to take place.
Offer Instalments gives the option for applicants to pay in instalments for the Event/ series of Events they have applied for. If this option is selected and a Payment Due By Date is provided, a number of instalment options are given depending on the number of months until the Payment Due By Date.
Additional Information Form allows you to use forms that have been created. This can be done under Settings > Forms. If the tick box for this is clicked, this allows any Additional Information Form to be selected, and will be asked during the application process.
Age From and Age To refers to the required age range of attendees at the Event.
Activity Section tick box should be selected if you wish for the Event to be included in the filtered online catalogue. Once ticked a drop down will appear for you to select from.
Activity Level allows you to indicate who this event is for. Once ticked a drop down will appear for you to select from.
Add Media is where you can add an image that will appear in the online catalogue.
Editing Event
 To Edit an Event, go to Events and click on the one you want to edit. In the left-hand corner you will find the Edit Record icon. Selecting this will open a window like the add record view, however, it should also include the fields you filled in previously, when creating the Event.
![]() When you Edit your record, the back arrow will appear. This allows you to Undo Edit Changes. The back arrow will not work after you have saved the record as your new changes will have replaced your previous save.
When you Edit your record, the back arrow will appear. This allows you to Undo Edit Changes. The back arrow will not work after you have saved the record as your new changes will have replaced your previous save.
 Once you have finished adding or editing your Event select the Save button in the left-hand corner. Note: this will not appear until you have added or edited at least one piece of information.
Adding Event Extras
 You can add event extras to an event. These are optional additional extras that applicants can select. To add an event extra, make sure that you are in edit mode, then go to the extras tab, and use the plus icon shown here to add an event extra.
Click on the event extra to start adding details. You can enter a name and information to the extra, which tells the applicants what it is. Tags are used to help filter. The capacity is the maximum number of people who can apply for the event extra. If you have more than one event extra, you can group them. If they are in the same group, then the applicant can only select one of them. The position determines where in the list the extra will appear. You can then add additional fees to each event extras. Finally, you can add VATCode and Ledger code that is set up in your settings. For more information on setting these up, please the System Settings > Accounts sections of this guide.